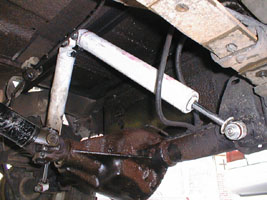
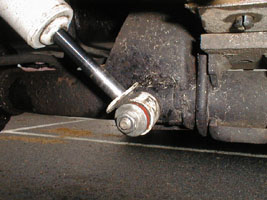
Custom Rear Shock Mount


Parts List:
- 1 - 2" x 2" x 1/2" x 42-1/2" Angle Iron
- 4 - Shock Mounting Studs (usually included with new shocks)
- 1 - 2"D x 2" Schedule 80 Steel Pipe
- Philadelphia Party Bus
- 2 - Rancho RS-9012 (YMMV)
Installation Instructions:
- Remove plastic fuel/brake/electric line holder from driver's side upper
shock mount.
- Remove both rear shocks.
- Drill two 1/2" holes 1/2" from center on one face of the angle iron.
- Mount the shock mounting studs with the stud extending from the outside
edge of the angle iron.
- Slide the angle iron onto the top of the frame rails just to the rear of
the upper shock mounts with the vertical edge facing forward.
- Carefully re-bend the rear brake line to provide adequate clearance.
- Ensure angle iron is tight against the rear of the upper mounts, flat on
the frame, and centered from side to side.
- Clamp and weld angle iron to frame rails.
- Remove muffler and tailpipe assembly.
- Cut the 2"D pipe in half lengthwise leaving two half pipes.
- Drill and tap for a 1/2" bolt in the center of each half pipe.
- Thread shock mount stud into half pipe so it extends from the radius.
- Place a shock onto the new upper mount and insert bolt with pipe attached
to other end.
- Place half pipe against the axle tube so that the flat edges of the half
pipe are parallel to the axle tube.
- Use the shock to set the correct angle of the stud in relation to the
axle. Mark edges of half pipe and remove shock.
- Clamp lower mount to axle tube using marks from previous step.
- Weld lower mounts to axle tube along the two parallel sides.
- Repeat for other side.
- Install new shocks.
- Ensure that NO lines, wires, etc. interfere with shocks even when
articulated in both directions.
- Concerning the exhaust (YMMV): I turned the muffler 180 degrees so the
outlet was towards the frame and had a local muffler shop fabricate a custom
tailpipe. Regardless, make sure that the shock will not contact the tailpipe
when fully compressed!
- If so desired, you might want to grind the welds and paint them to prevent
rusting.
- Last but certainly not least, enjoy the droop!
Notes:
- Emergency brake cable may need to be rerouted to avoid contacting the
shocks and/or exhaust.
- Custom tailpipe cost is approx. $60
- Might want to consider a guard where fuel/brake/electric lines contact
angle edge.
- An unforeseen benefit to me was the mounting of the shocks is in an ideal
angle to prevent body roll. Driving a SOA rig, I noticed a HUGE improvement in
stability!


